Windows Vista EZConnect Software
We recommend using the EZConnect Connection Manager for accessing our VPN service. If you’d like to manually configure Windows Vista the following guide shows how to setup a PPTP VPN connection. If you have any questions about setup please contact our support team.

Step One: Click the ‘Start’ or ‘Windows’ button in the lower-left hand corner of your screen, then navigate your mouse to the ‘Control Panel’ item and click.

Step Two: Locate the ‘View network status and tasks’ item under the ‘Network and Internet’ category, mouse over the heading, and click.

Step Three: Point the mouse cursor on the ‘Setup a connection or network’ item, third down from the top in the ‘Tasks’ sidebar on the left, and click to continue

Step Four: With your mouse, select the fourth item in the list, labeled ‘Connect to a workplace’ – click the ‘Next’ button on the lower-right corner of the panel, and move on to the next step.

Step Five: Mouse over the first item on this panel, labeled ‘Use my Internet connection (VPN)’, and click.

Step Six: For the ‘Internet address’ field, fill in the VPN Zoom hostname you’ve selected from our list of available hosts. The address in the example is not valid, and must be replaced. For the ‘Destination name’ field, you may enter whatever you wish – this is a descriptor of the connection. Of the three unticked options below, only the last needs to be ticked – check the box labeled ‘Don’t connect now, just set it up so I can connect later’. Move to the next step after clicking the ‘Next’ button. A complete list of our VPN servers can be viewed here.

Step Seven: Confirm your username and password from the confirmation email sent to you at sign-up, and enter both in the corresponding fields on this form – please keep in mind that our authentication system is case-sensitive, and even a single mis-capitalized letter will prevent you from logging in. If you’d like to save your password, check the second checkbox below, labeled ‘Remember this password’. Do not fill the ‘Domain’ field. Click the ‘Create’ button in the lower-right corner to continue. Note* Usernames always end with @vpnzoom ex. username@vpnzoom.

Step Eight: More configuration is necessary, so connecting now would potentially error out – you will need to mouse over to the ‘Close’ button on the lower-right corner of the panel and click to continue.
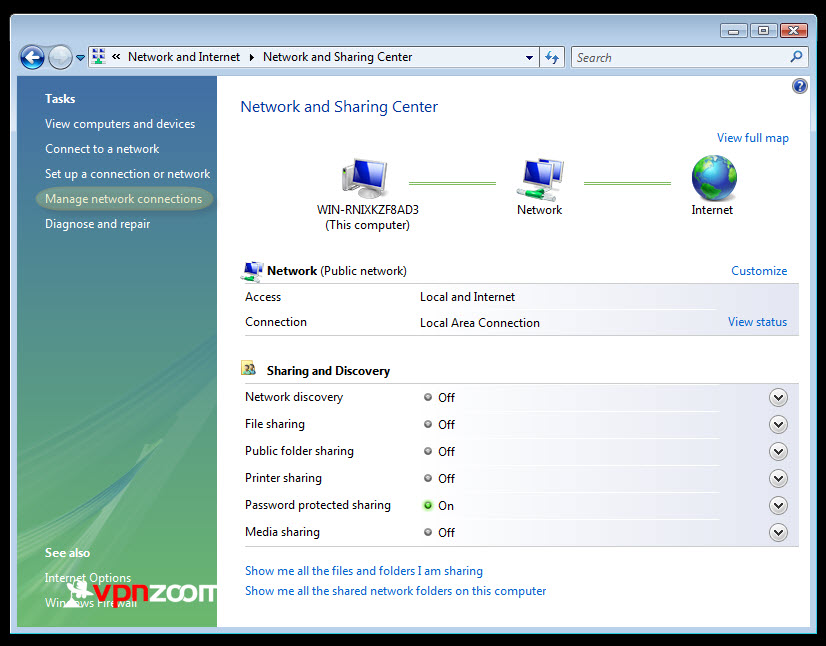
Step Nine: Back in the ‘Network and Sharing Center’, look for the link fourth down from the top in the ‘Tasks’ sidebar on the left side of the panel – the link is labeled, ‘Manage network connections’. Click this link to continue.

Step Ten: Depending on your folder view settings, the order of your icons may be different than in the screenshot. Also, if the name of your connection differs from our example, keep that in mind when selecting the connection. Look for the connection you made earlier, right click on the icon, mouse down to the ‘Properties’ item, and click your mouse to continue.

Step Eleven: Confirm the hostname from the VPN Zoom server list, and continue on to the ‘Security’ tab by clicking on corresponding tab indicator at the top of the panel.
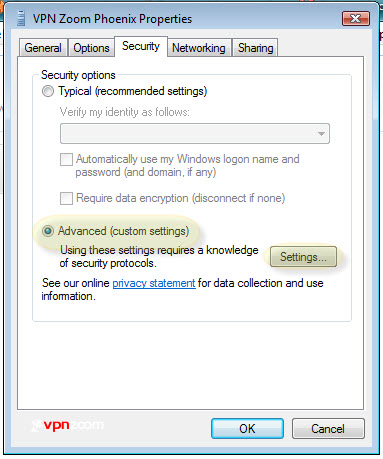
Step Twelve: Under the ‘Security options’ frame, select the ‘Advanced (custom settings)’ radio button – click the ‘Settings…’ button directly to the right to continue.

Step Thirteen: Click the drop-down box labeled ‘Data encryption:’, and mouse or arrow-key down to the ‘Require encryption (disconnect if server declines)’ item. Confirm the ‘Allow these protocols’ radio button is selected after making the previous change, and confirm that only the ‘CHAP’, and ‘MS-CHAP v2’ items are ticked in the list below. Please examine the screenshot as a reference. Click the ‘OK’ button to continue.

Step Fourteen: Following your confirmation of the previous panel, the dialog shown should display – click the ‘Yes’ button to continue.

Step Fifteen: Continue forward to the ‘Networking’ tab by clicking the tab of the same name near the top of the panel. Click the drop-down box labeled ‘Type of VPN’, and mouse or arrow-key down to the ‘Point to Point Tunneling Protocol (PPTP)’ selection.

Step Sixteen: In the center frame on this panel, uncheck the ‘TCP/IPv6’ and ‘File and Printer Sharing for Microsoft Networks’ items, as shown in the example. Confirm your settings, and move on to the next step. Commit your settings by clicking the ‘OK’ button near the bottom-right corner to continue.

Step Seventeen: To test your settings and login credentials, point your cursor to the ‘Notification Area’, usually located near the lower-right hand corner of your screen. In this area, look for an icon of network with a globe overlay (see the example), and click it. Click the link labeled ‘Connect to a network’ to continue.

Step Eighteen: Confirm the VPN connection name made earlier, select it with a single click – then locate the ‘Connect’ button in the lower-right corner. Click the ‘Connect’ button to start the secure tunnel.

Step Nineteen: Confirm your username for accuracy, then click the ‘Connect’ button in the bottom-left corner of this panel. After 30 seconds or so, confirm the connectivity status by opening the ‘Notification Area’ popup in your task-bar – you will be notified of any problems with the connection, in which case you will want to contact our support team. Once you have verified connectivity to the VPN, you can now have peace of mind that your online activities are secured from prying eyes.